
It's a Bugaboo Tutorial Day over at Catch the Bug Challenge Blog, and I am the lucky Guest Designer that has the privilege of putting together a technique tutorial for you today! :0)
First, here is the card I created using this Faux Tile Technique, using the great Coffee Time - Thanks a Latte image that Jodie has in store for you:

I'm very excited, and just a tad bit nervous....this is my first tutorial! LOL! So, please leave me a comment when you're done reading letting me know what you think! :0)
I like to use large images on my cards, to show them off, but sometimes I like to mix things up a bit with them, to add interest to the card. It is sometimes difficult for me to come up with new ideas for layouts when I use the bigger images, but this is one technique that definitely changes things up, I think! It's super easy to do, too!
CLICKING ON ANY IMAGE WILL ENLARGE IT FOR BETTER DETAIL VIEW
Materials Needed:
Colored Image -
for the purpose of this tutorial, image is sized to 3-3/4" Square
Coordinating Solid Color Card Stock -
for the bottom layer. I like to add half an inch, each side, to the dimension of the image size for this layer.
Paper Glaze, aka Glass Effects
Paint Brush
Cutter
Ruler

Begin by marking the image at equal intervals. For my 3-3/4" card, the image is marked at 1-1/4" and 2-1/2" on each side. Once cut, each square will measure 1-1/4".

Note: Compensating a bit on the cut dimensions may be needed, to avoid cutting in the middle of important parts of the image, like the face of a character, for example. It is okay for the cut tiles to not be exactly squared.

Once "tiles" have been cut, place them on a scrap sheet of paper to glaze them.

Apply a small dollop of glaze in the center of each tile - I prefer to work 3 tiles at a time, just to avoid the glaze drying a bit and, more importantly, making sure I don't stick an elbow in it. lol! ;0)
Apply a thin coat of glaze to each tile with the paint brush, working the brush in one direction and making sure that the glaze is applied evenly -
the layer I applied to these tiles took approximately twenty minutes to dry.
TIP: Rinse the brush with water after each layer of glaze is applied.
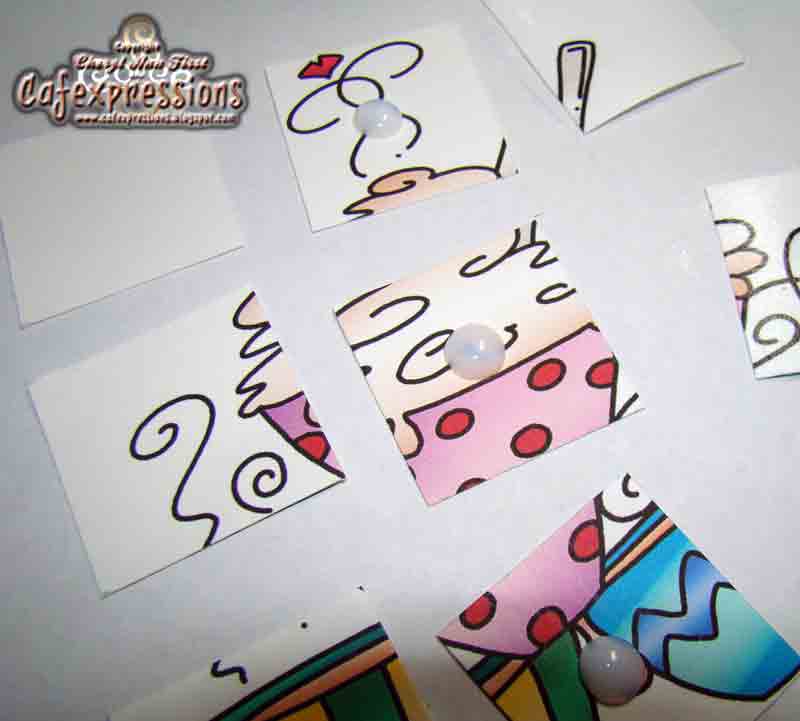
This image shows a closer look at the amount of glaze used. Adjust the amount according to personal preference, keeping in mind that the thicker the layer, the longer the dry time and more likely to have air bubbles in it when it dries.
TIP: Remove tiles from scrap paper immediately after each layer of glaze is applied to dry. This will keep them from sticking to the scrap paper. Remember to put the tiles back on scrap paper prior to applying each subsequent layer of glaze.

Once the first layer is dried, apply a second coat of the glaze, again working in one direction with the brush.
Optional - Apply a third coat, once the second has dried, to create an even thicker glaze layer.
TIP: Alternate the brush direction to give more of a worn look. There will be brush strokes, regardless of one-direction or bi-direction movements when applying the glaze.

After the final layer of glaze is applied, affix the dried, newly glazed tiles to a coordinating piece of card stock using a favorite adhesive. Make sure to leave a little bit of space in between each "tile": The bottom layer card stock acts as the tile "grout" - using a piece of card stock that measures 1/2" greater than each side of the image allows for approximately 1/8" in between each tile and around the edges.
TIP: Distress the edges of the tiles and coordinating card stock for some additional wear. (done on the sample card shown). Also, try inking the edges of each tile to give it additional depth and dimension.
The "faux tile" is now ready for use on a project! :0)
Thanks so much for stopping by today! I hope you have enjoyed my tutorial, and give this technique a try! I'd be so glad if you would drop me a link to your creation so I can come by and check it out! :0)
Happy Crafting!
This card has been entered into the following challenges:
This is turned out wonderful Cheryl. I'll have to bank this idea to try sometime. Hugs!
ReplyDeleteCheryl - this is an awesome tutorial! Wonder if we're related b/c I ALWAYS stick my elbow some place it doesn't belong (kind of like my foot sometimes!) =)
ReplyDeleteThanks for doing such a great job on this! =)
Hugs & Happy days!
~Min
Great tutorial. I like this idea will have to try it. Thanks. I like your work.
ReplyDeleteJust to let you know that your tutorial was so easy to understand and follow....please do some more! I am inspired to try this out!
ReplyDeleteWhat a lovely card! Great image and sweet details! Thanks for joining us at The Cupcake Craft Challenge this week! Good Luck! Hugs and sunshine!/Sari
ReplyDeleteSuch a lovely card and great tutorial :) Thanks for playing with us over at Cupcake crafts and good luck x
ReplyDeleteWhat a neat technique and a beautiful card! Thanks for the tutorial and for joining us at Tuesday Throwdown.
ReplyDelete