For a long time I have wanted a new scanner. The one we had was a flatbed scanner, but it does not have a driver for my new iMac, and it doesn't work with Windows Vista, which is on my laptop, which is what I use for my Sure Cuts A Lot and SVG files. Well.......after a year or more of putting off buying one, I finally bit the bullet and purchased an HP Photosmart Premium printer/scanner. I LOVE it! It prints beautiful photos (in part thanks to the additional photo black ink cartridge it uses), and it has several nice scan features, including not taking forever to heat up the scan lamp!
Anyhow, I wanted one because I, like most others, have many, many, many (you get the picture) snapshots from "back in the day" before digital cameras were all the rage.
One of the things I wanted to scan in and work with on my PSE program is a photo from my wedding day (in 2002). We had a phenomenal pro photographer, and I have a GORGEOUS, albeit disgustingly expensive, photo book from images I paid dearly for, but I wanted to use this one particular photo that someone shot at our wedding, right after we finished the ceremony and walked outside of the chapel to be whisked away by the limo. It really captured the true joy on both of our faces, but the photo was definitely over-exposed and needed to be cropped, BIG TIME. Here is the photo, untouched:
And here is what I did with it:
I first created an adjustment layer, and then used my Cookie Cutter tool to create a feathered photo frame (there is also another layer added and merged to the cookie cutter to add the cream color). Today I learned, after much poking around the filters options, how to warm up my image to help diminish the over-exposed colors. I LOVE that feature!! I have so many over-exposed images in my collection! lol! (You'd think I would learn to adjust the camera, right?? Sheesh - talk about poor usage of technology, huh?!) LOL! Anyhow, the end result made me so happy! What a huge difference, I think!
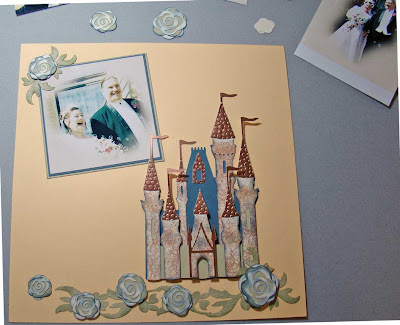
After I finished my photo editing, I used it for my scrapbook page that I was SUPER excited to make! You see, recently I purchased a new SVGCuts.com file, called Fairy Tale Castle. (I may talk tough, but really I am just a girly-girl at heart - I just hate talking like one. lol!) I know.....you're thinking, "What???".
Back to the scrapping........I used this file to make a page element for my page (because this was all born in my brain LONG before I even bought the scanner, mind you). I stamped my papers with a texture stamp that I have ( it's called "webbing") in three different pigment colors: Galaxy Gold, Platinum Planet and Cosmic Copper - all from Brilliance Archival Inks. I used some glossy copper cardstock that I had in my stash for the rooftops. I ran the rooftops through my Cuttlebug to make them textured. I left the flags hanging out the bottom of the embossing folder so that only the roof is embossed, and not the flags.
I used pop-dots to create the dimensions with all the layer cuts.
The roses on my page were a freebie SVG file from Mary (she's the whip! Seriously! Go check her out if you haven't already - www.SVGCuts.com!) Anyhow, I actually layered them with two additional bottom layer cuts, rotated a bit, to raise them a little more than just the two layers had allowed. I did some sponging on the edges of all the cuts beforehand, to add a bit of warmth and depth to them.
The vine and corner vine is a cut from a Cricut Cartridge called Storybook. This is also sponged, and I ran it through my Cuttlebug using my polka dot embossing folder.
I haven't made my title for this page, yet. I am still deciding what it should say. (This is almost always my last step, and almost always my most difficult decision when scrapping). Here's the ones I've narrowed it down to :
"May 3. 2002" in the top right corner regardless of what else I choose from:
"Our Story Begins...."
"Happily Ever After Starts Now"
"Truly, deeply, madly..."
I could really use an opinion or two on this - any suggestions???!
Here's the page! I hope you like it!

MATERIAL LIST
SVG Files - Fairy Tale Castle, Freebie Rose - both from www.SVGCuts.com
Cricut Cartridge - Storybook
Papers - All Stampin' Up - Apricot Appeal, River Rock (retired), Blue Bayou (retired), Confetti Cream, Mellow Moss
Ink - Stampin Up, Not Quite Navy & Mellow Moss
Sponge Daubers
Tombow Mono Glue
Cuttlebug Machine
Cuttlebug Polka Dot Embossing Folder
Cuttlebug Tiny Bubbles (I think this is what it's called??)
Texture Stamp "Webbing"
Brilliance Pigment Inks - Galaxy Gold, Platinum Planet and Cosmic Copper


No comments:
Post a Comment
I read and enjoy every one of your comments! Thank you so much!