Search This Blog

Showing posts with label Contest Entry. Show all posts

November 13, 2010

SVGCuts.com Monthly Challenge Entry #2

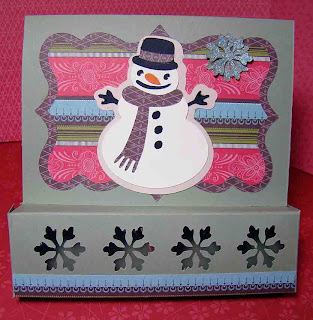
Hi, everyone! I'm still working on Christmas cards (probably will be for a while!). and this one also meets the criteria for the SVGCuts.com Monthly Challenge. Their challenge is to use elements from one, or both, of their svg collections: Santa's North Pole Workshop and Christmas Cookie Party Collection. For this card, I used elements from the Christmas Cookie Party Collection!
I cut a card base that has an attached treat box. (You can find the template and tutorial here. I will be creating an svg file for this later, but used the template and did some hand-cutting for this card).
I scored my card, per the directions, and then lined up my still-flat card stock on my cutting mat. I arranged the snowflake svg's on my virtual mat so they would show up on the front of the treat box once it was folded. I then used two of the snowflake cut-outs, applied some Stickles glitter glue (Baby Blue) and let them dry overnight. I used dbl-sided tape to adhere a piece of acetate on what is now the inside of the box part of the card.
I cut out the Snowman Cookie pieces, and layered them together. For the base paper layers, and the snowman hat and scarf, I used Stampin' Up paper called Ski Slope (retired).
I cut the scalloped label, top and bottom, for the base layers on the front of my card.
On the inside of the card, I used the Snowman Soup poem (you can find several versions of this online). I printed it out on my card stock, and to cut the scallop shape, I first cut it from a piece of blank memo paper. I line the paper up in the corners of the mat when cutting. Once the shape is cut, I layer the memo paper on top of my printed poem card stock so the print on the card stock is centered in the cut-out of the memo paper. I then line up, while carefully holding the card stock in place underneath, the memo paper back to the corner I had originally placed it on the mat. The card stock will not line up it's corners in the same place, but this will put the card stock where the scalloped label cut on the machine. (I hope this is making sense!!).
I have to pickup some candy cane sticks, and then I can finish this for my son's stocking! I will place the cocoa, a large marshmallow and the stir stick in my treat box once I have all my ingredients.
Thanks for stopping by to take a look!
Happy Crafting!

November 11, 2010

SVGCuts.com Monthly Challenge Entry

Hi, everyone!
The past two days I have been working on a Christmas card, and it meets the SVGCuts.com challenge, so I'm entering it on their forum! The challenge is to create a Christmas card using either (or both) of their SVG sets, Santa's North Pole Workshop, or Christmas Cookie Party Collection. (My card uses files from the Santa's North Pole Workshop Collection).
I created a tri-shutter card base, which you can find a tutorial for here. I chose colors and papers from my stash of Stampin' Up papers. I used Baja Breeze, Riding Hood Red and Whisper White. I used some designer paper from the Candy Lane (retired), Ski Slope (retired) and Bride Specialty papers. I cut the santa and Mrs. Clause files, and they are embellished with some 3D Paint I picked up from JoAnns. It's made by Duncan, and it is called Glittering Crystal. I applied it very sparingly, to pull more glitter than white from it. I also used Duncan Glossy Winter White 3D paint for the cake frosting that Mrs. Clause is holding. I drew the faces on each figure - I was worried that the small sizing would not cut the eyes properly from the svg file.  I chose the "Jolly" caption for the center of my card, and created the layered oval with the phrase "Have A Holiday" around the center. I used Optima ExtraBlack font for the lettering in my SCAL program.
The train and candy canes are from the SVGCuts.com files, and I embellished them with Stickles Diamond Glitter Glue. The train has some Candy Cane Stickles, as well. The tiny snowflakes are from an EK Success border puch I have. I was going to use the snowflake border on the card, but didn't like the look. so I used the scrap flakes around my card, instead! :) Each is touched with a tiny bit of Stickles on the points and in the middle.
Thanks for checking out the card. Hope you like it!
Happy Crafting!
Clicking each photo will enlarge it for better detail


September 11, 2010

Scrap Hoarder Challenge/Bugaboo Challenge

Okay, so I'm way late on the ball for the Bugaboo "Dog Days of Summer" Challenge, and I messed up the challenge rule to use neutrals and only one other color (can you say EPIC FAILURE?!! Oops! I hate when that happens!) but I combined it today with a challenge that Bee posted over on SVGCuts.com forum.
First, Bugaboo's challenge was to create a card that represents the Dog Days of Summer to you. Well, to me, the end of summer means the end of having to mow the grass so darned much! :) Plus, the kids are back at school, so it becomes peaceful in the neighborhood. (I love not hearing the 4x4's up and down our road all day!!!)
Second, Bee posted that she is a hoarder of supplies. Well.........I can definitely relate to that!! Her challenge, to any and all willing to accept, is to use those supplies that you purchased "oh so long ago" for that "special" project that has never come to create a card. So, I did just that!
I had some Stampin Up paper in my stash called Rainbow Sherbet. I have been on a kick with the bright, bold colors (especially the bright greens!), and this had that in them. so I figured it's high time to use this pack! I also had some really cool Boutique Brads that matched this paper really well, and some of the Bold Bright SU brads, too. Here's my card!
This is also the first time I've ever made a tri-shutter card! What fun! I decided that they are a very time-consuming card to make, and require almost as much time as a scrap page, though, so I'm not sure I'll be creating too many of this kind, even though I think it's a cool card style!
I hand cut the martini glasses and umbrella from some scrap paper. I used my EK Success Punches for the front label, and I made the "olives" by coloring on a SU Old Olive brad with a red gel pen to make a pimento. :)  (That's my favorite part of this card!). I also added some Crystal Stickles to the glasses to make "bubbly". (I know martinis aren't bubbly, but it looks cool, right?! lol!) ;)
Anyhow, here are some close ups for you. Notice the shades? I colored them with a marker and then used a gel pen to add "glare". :)
Thanks for checking it out!


September 8, 2010

Cely's SVG Challenge & A Freebie!

Okay.....so the hubby took off back for the mountains today, and I was able to take a quick break to work on a card for Cely's SVG Challenge! She gives away all kinds of wonderful svg's that she creates, and to celebrate her 100th follower, she is having a contest. The prize is a free svg digicart from SVGCuts.com of your choice! The challenge........to create a card using any of her free svg's! Pretty easy-peasy, right?! You can even enter twice! She is going to choose one random winner, and one judged winner (actually, she has someone else choosing the judged winner, but you get the point!). :)
Without further jibber-jabber, here is my card!
(Click the photo to enlarge)
My pic is a bit skewed. Usually I will set up some background paper, and really take my time with the photo, but this place is TRASHED, and I don't think there's a flat spot around this week for laying out papers, so............well....it's skewed. But there's a plus side....you can see the Stickles Rock Candy I used for honey, and the flower centers are Yellow Stickles glitter glue. Also, the embossing on the background shows up better, too! :) (I used the Textile Cuttlebug embossing folder on the Not Quite Navy paper by Stampin' Up).
For Cely's svg's, I used her Stump and Dog, Beehive and her Out On A Limb svg files. I stretched her stump to make it tall. I used my SCAL program to remove the owl part of the limb and then I used the Path menu to Union the beehive base to the limb, and the limb to the stump to give her beehive a place to hang. The More Mustard designer paper background is cut with my one of my Nesties Curved Rectangles dies. I inked the edges of the sentiment, which was punched with my Stampin' Up Scalloped Oval and Oval punches. I also inked the stump (tree), limb, and the dog with some Stampin' Up Soft Suede and an ink dauber. I added the spots on the dog, trying to make it look like my spotted beagle, Mia. :) His nose is colored with a black gel pen, as well as the hand-drawn bees and beehive entry hole.
The flowers are Prima flowers from my many jars. 
Here is the inside of the card, which is also your freebie for today! (Something new from me.....a digi-stamp sentiment! ) The freebie does not have the bee flight path dashes, but it does have the flowers, jar and bees, as well as the sentiment. (Not colored in).
(This file is a jpg).


Again with a skewed photo - only this time I cropped out my ugly, inky thumb from the pic! lol!!!
Thanks for checking out my card today, and don't forget to stop over at Cely's blog, Creating in Carolina, to join in the challenge!

Please leave some love if you enjoy my freebies! I love to hear from you! :)
If you have any problems with the file, please let me know so I can fix it for you, and for others!


And, PLEASE....


Any files I offer are for PERSONAL, NON-COMMERCIAL USE ONLY.  This means that you may not sell them, alter them, or share them. They are not for use on websites (including blogs), or for marketing in any way. 
Should you wish to share any of these with others, please post a link to my site and give due credit.
Links are available for one week only, so grab them while you can!
The files I offer are typically compressed, and will need to be un-zipped prior to use.
You can contact me at cherylfirst1@yahoo.com if you have any questions about any of my files, or if you just want to drop me a note! :) 
Happy Crafting!

August 3, 2010

Peachy Keen Stamps Challenge #34 Card

Today I put together this card for Peachy Keen Stamps Challenge #34. It is a sketch challenge running all week, so check it out! They're giving away some great stamps for the winners of the challenge (and I want to win! hehehe!)
Here is the sketch they posted

And this is my card.....
I used my Basic Grey Paper Pack called Indian Summer. I cut the flower petals and leaves with SVGCuts digicart, 3-D Flowers. The horizontal paper strip is embossed with Cuttlebug embossing folder, Forest Branches, and the vertical paper is punched with EK Success Dotted SCallop Border Punch.  All of the papers are inked using sponge daubers.  It's hard to see in the photo, but there are several white gel dots on the flower petals as highlights, as well as on the edges of the designer paper base.
I used a Peachy Keen Dolly Dumpling face stamp in the flower center to give it the character! :) Isn't that cute!?! Thanks for taking a peek!

June 13, 2010

SVGCUts.com Monthly Challenge Entry

For the SVGCuts.com Monthly Challenge, Mary and Leo chose a scrapbook layout to work with, and the theme is "All About Me".
Now..............this is truly a challenge for me for many reasons: first, I have very few recent photos of myself, as I am normally the person behind the camera! Second, I do not like talking about myself - it's not my favorite subject. And last, because "All" about me can't possibly be summed up in just two photos and a small journaling area.
With that said, this is my entry. I spun it so it is more "All about me, in love". This made things a bit simpler to put on paper, and to keep it looking "cohesive". A page that entailed more "about me" would have ended up one big jumbled mess, and I would have had to pull my hair out at the result - jumbled, messy scrapping is not my style! (It's a control-thing, just nod and go "uh-huh, uh-huh....okay".)
Material List


CTMH That's Amore Designer Paper
Stampin' Up Buckaroo Blue Card Stock
Pastel Pebbles Brads
Prima Flowers
Sure Cuts A Lot
Cricut Expression
Stampin' Up Marker - Chocolate Chip
Distressed Stickles -  Aged Mahogany, Mustard Seed
SVGCuts.com DigiCarts - Breezy Meadow Butterflies,  Little Sweet Peas, Lovers Lace Freebie, Spring Flourish Square Freebie, Strawberry Lane
Cuttlebug
Embossing Folder - Swiss Dots, Butterflies
Sponge Daubers
Stampin' Up Ink - Soft Suede, Whisper White Craft Ink
Gel Pen

I made the square "Me Collage" and "in Love" title box using SCAL and some fonts (sorry - I forgot to write down the ones I used for the "me"'s). The "in Love" is a welded "Ballpark Wiener" font.  The top layer is embossed with my Cuttlebug using a folder called "Butterflies" and the "in Love" is embossed with the "Swiss Dots" folder. I then used a white gel pen to add the faux stitches, and I sponged the edges and raised images with Whisper White Craft ink to help them stand out.
I used "Label 2" bottom from the Strawberry Fields DigiCart to create the background layers, which also has some gel pen "stitching" on the top layer.  The Heart Frame is from the Little Sweet Peas DigiCart for the frame around the top right photo, This is embellished with the Stickles Mustard Seed glitter glue. The Butterfly is #9 from the Breezy Meadows DigiCart. This is sponged with the Soft Suede ink on the edges of the top layer. I used pop-dots to add dimension to the wings.
The Lovers Lave cut-outs have Stickles embellishment in them, and the simple rectangle frame around the photo on the left bottom has more white gel pen "stitching".
The Spring Flourish was layered on top of some designer paper, and I added Prima flowers, Pastel Pebbles and the butterfly to dress it up.
The journal heart is something I made in SCAL using the Basic Shapes file (circles and heart).
Thanks for checking this out! It was definitely a challenge for me, and win or lose, it was great fun to put together!

January 25, 2010

Dustin Pike Challenge #2 Entry

I needed a scrap break, so today I did some coloring and created this card. This is a Dustin Pike freebie digistamp that you can pick up on his blog here. I decided to join in on his challenge blog with this. Challenge #2 is a Sketch Challenge by Lelia. Here is the sketch:

I printed the image on some Whisper White Cardstock. I used my Prismacolor Pencils to color in the dragon. For an extra touch of dimension, I colored his body in a light color green, and then I added some very small circles to represent scales on him. I did something that I haven't done before, but had always wanted to try: I used my white eraser to add some highlight and do some blending after I had used my Aqua Brush on the image.
With a few of my gel pens and glitter gel pens, I added some "bling to the scales, shirt and bells. The horns on this character are a beautiful turquoise glitter, but they show more silver in the photo - there was just not good light to capture the true color.
For the shape that the dragon paper and it's mats are on, I used my Cricut and an svg file from www.svgcuts.com called "Simon's Square Shapes".
The "Party" letters are cut on my Cricut from a font called "Jokerman". I cut the clock in my Sure Cuts A Lot program by welding shapes together from the Shapes file. The clock hands are stamped from a CTMH stamp set called "Make It Count" (retired).
The bottom of the card is embossed with a Cuttlebug folder- D'Vine Swirls.  A few metallic green mini brads in the top corner, and I was done! Thanks for checking it out: I hope you like it!


Material List

Stampin' Up Cardstock - YoYo Yellow, Real Red, Whisper White, Green Galore, Garden Green, Almost Amethyst
DCWV Cardstock - All About Boys
Prismacolor Pencils
White Eraser
Aqua Brush
Glitter and Gel Pens
Stampin' Up -Elegant Eggplant Inkpad
Close To My Heart Stamp - Make It Count (retired)
Metallic Mini Brads
Cricut Expression
Sure Cuts A Lot Software
SVGCuts.com File - Simon's Simple Squares
Cuttlebug Machine
Cuttle Embossing Folder - D'Vine Swirls


November 29, 2009

Cards, cards and more cards!

I have been super busy: spending some time with my son over the holidays, working on moving my craft items into my new craft space, and trying to finish some Christmas cards for sending out in time for the holiday! I did manage to sneak in two movies this week, too. :) "Old Dogs" and "Disney's Christmas Carol in 3-D". I highly recommend them BOTH for a great time out with the family! They were fantastic!

Here are some cards I have been working on, and finally finished today!

I have been using files from www.svgcuts.com for many of the cuts shown, and I have been digging through my stamps for phrases. Hope you like! If you want additional info on the materials used for any of these, just let me know, and I'll post. I haven't been posting much detail, due to my limited time.

October 22, 2009

SVG Cuts October Challenge Entry

This is my challenge entry for the SVGCuts.com October Challenge (their link is in my sidebar, so check them out!)

I originally planned on a wreath, but someone else beat me to posting it, so I changed plans to this popcorn card crypt! I used Mary's incredible 3D Flowers svg cuts to make all the flowers out of SU Bride and Groom foiled specialty papers. I used Stickles on some, traced the pattern with gel pen on others, and sponged the edges of some of the others! I also cut the leaves from a freebie Maple leaf file that Mary offered up on her blog (again, check out my sidebar and go to their link!). I used more gel pens and Stickles on the leaves. All of these are attached with glue or pop dots to a card stock covered shoe box.


The grim reaper on the front is from the Monster Mash Halloween Collection, as are the black strips on the bottom of each side of the crypt. The orange paper along the top is made using Martha Stewarts Drippy Goo Border punch that I really love!


I hand-cut the shape of the tombstone, and sponged it to make it look grungey before glueing the letters on. These were cut using my Sure Cuts A Lot and Cricut (you can purchase this awesome software by clicking the link at the top right of my blog! Super deal!!). I used Stickles on the letters to stand them out.
The fantastic skeleton is a file I found at Denise's Scrapbooking Room . She did a great job, and this is really easier to assemble than it looks like it would be!


My popcorn cards are made with SU cardstock and some papers from Debbie Mum's Harvest and Holiday paper stack. I used a retired SU stamp set, Booglie Eyes, and my colored pencils, some ribbon, charms, and dbl side sticky tape to put this all together. When you pull the ribbon, a popcorn mini bag comes out! :) Cool, huh??

Thanks for checking out my project! Hope you like (and hope I win the contest!).

September 27, 2009

SVGCuts September Contest Entries

What a great weekend for crafting! Gloomy, crisp fall weather kept me home all weekend, and with Chris out of town, I was left to my own thoughts (and, yep...I actually had some! lol!).


These pics are of some cards and a home decor project that I put together for http://www.svgcuts.com/ September contest. The first prize is a $20 gift certificate for some svg collections, with the second and third prize being one file of choice - I could certainly use any of those! :)


Blessings Card


This first pic shows the Blessings card I made using a stamped image someone had sent to me in a trade. The contest rules state to use fall colors: I was extremely pleased with her! I also had to use an svgcuts image, and on this one, I used Linus;s 3D Fall Cards, the sunflower card. I colored the image in with my Prismacolor pencils, and there is much sponging and distressing on this card. The "blessings" stamp is from the Verve Stamp Set, "Little Punkin". As typical, the pattern paper was out of my stash. The paper in the middle of the sunflower is really cool, I think! This I had purchased on Friday at a local scrapbook store. I bought it to use in my husbands rock n roll album, but snuck a circle piece for this card because it was perfect! Her flowers are all glittered in a beautiful turquoise blue, using Stickles.


Happy Harvest Scarecrow Card

This second picture is of my Happy Harvest Card. I used the same collection for the card, but used the cornstalk instead of the sunflower this time. The scarecrow is from an old Stampin' Up set, Happy Harvest (from 1999). The scarecrow is also colored with Prismacolor pencils, and the cornstalk is lined with a copper-glitter gel pen. I think my favorite part of this is the ribbon. :) It's gorgeous fall colors really set nicely on the marigold colored paper.


Home Decor Project


This next set of photos is from the home decor project I tackled. I used chipboard for the letters on the frame, some glassy glaze, sponging, bleaching (on the leaves), scoring......just about every technique there is! The flowers are from Mary's 3D Flowers, and the bare trees were one of her freebie files. (As of this posting, the svgcuts site is down right now, but I will try to remember to post links later). The branch cut-outs were from Harvest Hill, and the maple leafs were another of the freebie files on her blog. (She's the best! So generous with her freebies!).

The sunset background in the frame was done using baby wipes and re-inkers. To achieve this look, fold a baby wipe in half, place a thin line of the ink color of choice (or you can do multiple colors at a time, placing each color next to the other on the line side-by-side, not top to bottom). Swipe lightly across your paper until you have the color depth you desire. Simple as that!
Thanks for checking it all out! TTFN!