Search This Blog

Showing posts with label SCAL. Show all posts

August 26, 2011

Free SVG Friday - Fancy Scallop Oval Frame

Hi, everyone!
I managed to create this fancy frame this week. I'm still sifting through paper piles, trying to organize....yep, I said STILL! lol! I'm a little distracted with mountains of laundry from my son coming home from school, and working on settling him in. It's taking a bit longer than we planned because he's already working full time, which is a good thing! Yay!
Anyhow, here's what I came up with for you this week
Fancy Scallop Oval Frame SVG
These SVG files are no longer available for free.
Please visit my SVG's for Sale Page located at the top of this blog.


This frame measures approximately 4"tall and 3-1/2" wide as sized in the file. Of course, you can re-size it to your liking, or remove the middle oval to create a mat. :0) I haven't had time to cut this one, yet, so if there are any issues with it when you try, please do let me know so I can correct them! Thanks for stopping by! 

July 9, 2011

Digis and Vinyl?!

Yes.....absolutely! :0)
Hi, everyone! This is something different from me today.....something I had been planning to do for......ohhhhhhh.....at least three years, but never did "get around to it"! Lol! It wasn't until my good friend, Cely, you may know her as Carolina Girl of Creating in Carolina, showed me the awesome cake carrier she decorated that I kicked myself into gear to "take care of 'da bizzzz-ness!!". Hahaha!
Anyhow, Cely is currently a Guest Designer for Bugaboo Stamps.....and you all know how much I LOVE Bugaboo, right?! Well........she decorated her cake carrier using one of Jodie's images (make sure you check it out, it's incredibly adorable, and may even have you wanting to buy stock in vinyl......you'll want to decorate everything in your home after you see it!!). After I saw it, I emptied all the "cookies" out of my dogs "cookie" jar, and busted out a scrap piece of my vinyl (I actually had to dust it off......seriously!). I knew what I wanted to do, so I set to it........I set up my Cricut, and I opened up SCAL on my iMac.......
After doing an image "Trace" in SCAL, and making some sizing and a few changes to the traced image, here's what my final vinyl looks like:
(Click Image to Enlarge)
I put this adorable Rottweiler Puppy - Pile of Bones Image on both sides of the jar. Isn't it cute?! (I had to add the white paper inside the jar so you could see the image best). I'm really excited about how it turned out. My dogs could really care less, but it looks good on the counter, and even the hubby had a chuckle over it's "darling-ness"! lol!
The Bugaboo Catch the Bug Blog Challenge is to create a "Clean and Simple" project this week, so I am entering him into the challenge! 

Note: Due to copyright, I am not able to share this svg file with you, but if you have a cutting program, please consider purchasing the image, or others, from Bugaboo Stamps to create your own file! :0)

July 8, 2011

A HOT summer, so far......

Hi, everyone! It's almost the weekend, yay!! I love my weekends because the hubby is home from work, so we can spend some time together! :0) I hope you all have big plans for the weekend, and can enjoy some summer weather. It has been hot here, so far, this summer. This week we have seen several high-80's temperatures, and a lot of humidity (which I hate!). I wish there was a beach nearby......but no beach in site here in the hills of WV! lol!
I was daydreaming......about the beach.....and put together this shaped summer card for you! The free svg file contains the shaped card base, the water and sand layers, the umbrella and layers, plus the bucket, shovel and a couple other "accessory cuts" (which I ended up not using on this card, but maybe you will like them for yours!).
For my card, I used some Stampin' Up card stock from my stash. I'm sorry I do not know what colors......I kind of grabbed and cut without looking. The umbrella and toys are cut from a DCWV stack called Cafe Mediterranean. I used my white gel pen to add some details.
So, that's it for me for now! Be sure to stop by on Saturday to see what I'm doing with my digi stamp and vinyl! :0) In the meantime, stay cool.....and happy crafting!

Please leave some love if you enjoy my freebies! I love to hear from you! :) This is how I know you were here, like what you see, and would like to see more! If you're not already, consider becoming a follower so you can be informed of new free svg posts each week! :0)
I am offering the file download for a limited time, only. 
The links will be active for approximately one week only, so get them while you can!
If you have any problems with this file, please let me know so I can fix it for you, and for others!

And, PLEASE....

Any files I offer are for PERSONAL, NON-COMMERCIAL USE ONLY. This means that you may not sell them, alter them, or share them. They are not for use on websites (including blogs), or for marketing in any way.
Should you wish to share my files with others, please post a link to my site and give due credit.

The files I offer are typically compressed, and will need to be unzipped prior to use.
Cut files are in SVG format and are compatible with Sure Cuts A Lot, and any other software cutting program that supports svg files. Digital papers are typically .png format.
You can contact me at cherylfirst1@yahoo.com if you have any questions about any of my files, or if you just want to drop me a note! 
Happy Crafting!  :)

June 20, 2010

A Name Collage for me!

I finally decided to make something for me, and not for someone else! :)
This is a name collage of my son. I have a ton of photos of him in his school uniform, but only a few of him in "civies". This is one of my favorites. :)
Material List
Printed Digi Scrap Pack - Jeanne Marie's Scraps
(you can purchase this at www.acherryontop.com)
Red Hemp Twine
CTMH Bitty Brads - Aged Copper
Sponge Dauber
Stampin' Up Ink - Baja Breeze
Tearing Edge Rule


June 17, 2010

Fathers Day Card


I played with the "Trace Image" and Pages features of my SCAL today to make the cut files for this ship wheel.
Material List
CTMH Majestic Blue Level 2 Paper Pack
Stampin' Up Old World Map BG stamp
Inkadinkado (?) Compass stamp
Stampin' Up Ink -  Chocolate Chip, Soft Suede
Stampin' Up Cardstock - Blue Bayou
Stampin' Up Very Vanilla Designer Brads
Pop Dots
Sticky Strip
American Crafts Ribbon
Sponge Daubers

June 9, 2010

Another Name Collage

This one is a birthday gift for a four-year-old.
I have had the Dreams & Dragons Stampin' Up Stamp Set in my stash for years, and hav eonly used it a few time. I really felt it was a perfect addition to the Close To My Heart Daydream papers I used for the letters of her name.

Material List

CTMH Daydream Paper
Stampin' Up Card Stock - Gable Green, Green Galore, Whisper White, Pixie Pink
Cuttlebug Embossing Folder - D'Vine Swirls
Prismacolor Pencils
Stampin' Up Ink - Pacific Point, Baja Breeze
Sponge Daubers

May 24, 2010

Vinyl on a Mirror

I made this for one of the barracks at my son's school. Their mascot is the eagle, and they have a large wall in their lounge that needed "something". My original plac was to etch the images on the glass, but the Armour Etch cream says not to use on large areas, and I did not want to chance the eagle image not working out and ruin the mirror. The mirror measures approx 60" x 30".  I still have a few air bubbles to work out of the eagle's body, and their are still retail stickers on the mirror to remove. I am leaving the cardboard "box" on it until I make it to the school. :)
Hope you like!

May 17, 2010

Cruise Layout

This is a page that I pulled svg's from several of my favorite blogs, plus made the porthole frames from the SCAL Shapes Library, to pull the whole page together. I welded the seasurf svg together to create the bottom water border.

Material List

CardStock - Stampin' Up Whisper White, Ballet Blue, So Saffron, Buckaroo Blue, Cool Carribean
The Paper Co. - Chromatic CardStock
Paper Studio - Shimmer Grey 
Stampin Up Punch - Word Window
Silver Brads
SVGCuts.com DigiCart - Swirlies  (SeaSurf svg)
Denise's Scrapbooking Room - Cruise Ship SVG


April 29, 2010

Mom's Card

Last night I worked on a Mothers Day Card for my mom.  I was waiting fir it ti dry before posting.

Material List

Stampin Up Cardstock - Rich Razzleberry, Crushed Curry, Pretty in Pink
Stampin Up Razzleberry Lemonade
Stampin Up Ink - Rich Razzleberry, Crushed Curry
EK Success Border Punch
Craft Ribbon
Stampin Up Stamps - Organic Grace
Pop Dots
Dew Drops
SVGCuts DigiCart - Swirlies, Sunflower Frame
Sure Cuts A Lot
Cricut Expressions

April 24, 2010

Busy, busy!

Today was spent doing housework, light shopping, mowing the grass and working on a layout.
This layout doesn't have the journaling on it, yet (I'm waiting for the information from the person I am doing this for). The journaling will be in the top left corner of the left page.
This is a two page layout. I used a bunch of papers and scrap from my stash - no particular brand to list, sorry. All the squares along the top and bottom are 1-3/4" with a 2" base layer. The two square photos on the right page are 5" square, the small photo is 4" x 5", and the largest photo on the far left is a 5" x 7". I really like the look of the layout with the larger photos!
Hope you like!

April 23, 2010

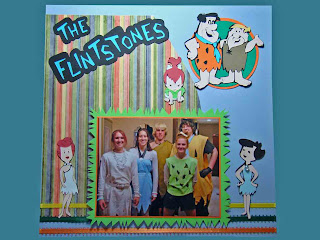
Flintstones Layout

I just love cartoons! I'm meaning the older Hanna Barbera, Looney Tunes, and similar. I'm working on donation scrapbook #2, and when I saw the costumes that the kids were wearing for Halloween in one of the photos I was sent to use, I knew exactly what I was going to do!
I found some excellent Flintstone SVG files on Mardenz blog here.
Be sure to visit her because she has some GREAT stuff!!!
I made all my cuts, glued my pieces and parts, and came up with this layout. Hope you like!

April 19, 2010

Tribute to a Pet

A co-worker of mine recently had to put down her beloved Holly, an Aussie Shepherd she has had for over fifteen years. I am not very good with expressing words for occasion like this, so I made this for her.
She had emailed friends a photo and this beautiful prose.
It took me approximately five or six hours from idea concept to completion, even though I had some incredible inspiration from Amy - she is the master of name collages, and has a great technique and gallery of the ones she has made on her blog, here.

I presented this to my co-worker today, and she was very misty-eyed, so I think she really likes it. I could hear her telling others throughout the day, "look what Cheryl made for me!". That made me feel good. I'm glad it is something she can hold on to. :)

Material List


Frame - 12" x 12" x 3" Shadowbox (I picked mineup at Hobby Lobby at a 50% sale for $15).
Close To My Heart Papers - Emporium
Prima Flowers
Close To My Heart Spring Brads 
Stampin' Up CardStack - Cranberry Crisp (retired)
Cuttlebug Embossing Folders - Stylized Flowers, Textile, Moroccan Screen, Victoria
Stampin' Up Ink - Ballet Blue
Sponge Daubers
Pop Dots
SVGCuts Breezy Meadow Butterfly #5 cut file
Lace Frame by Monica's Creative Room 

March 7, 2010

Boars Head Dinner Dbl Layout

These are some pages I completed for an album for another HMS cadet's mom. I pulled the photos from the Howe Herald online blog - being the Battalion Commander makes Jake a "high profile" photo figure at the school, so I copied some of the school pics (with permission, of course) to use in the book I'm making for his mom. :) She wants to be surprised, so I think this layout will be a nice surprise for her.


This page shows Jake and Anna as the "Lord & Lady of the Manor", aka the dinner "hosts". Donned in their Renaissance garb, they look darling!!! 


This page has photos of the choir, wisemen, feast and jester. All of the kids partake in the event in one way or another, including the lower school cadets (as you can see by the jester outfit!).

Materials

Stampin Up Cardstock - Elegant Eggplant, Real Red, Glorious Green, Summer Sun, Brilliant Blue, Whisper White, Basic Black, Blush Blossom
Karen Foster Designer Paper
Font - Blackmoor LET (on the iMac)
Stampin Up Vintage Brads (retired)
Stickles
Sure Cuts A Lot Shapes File
SVGCuts.com files - A Royal Festival, 3D Birthday Cards (Argyle)
CTMH - Boutique Borders
Stampin Up Ink - Glorious Green

January 27, 2010

Must be "Dragon Week" at my house!

Today I finished a page that focuses on a photo of my son (15 years old, at the time) standing in front of an enormous Lego Dragon (some call it a sea serpent - we say "dragon") at Downtown Disney in Orlando, FL.  My family loves dragons! As a teen and young adult, I used to scour stores before Christmas looking for just the "right" dragon figurine for my step-dad. He always was a huge fan of dragons, so it became a tradition, of sorts, to purchase something dragon-related for the holiday. There are five kids between him and my mom; needless to say, he received dragons in excess!
Anyhow, this love of dragons, which is the Chinese Symbol of Good Fortune, was passed down to all of the children in our family. When I met my husband, one of the first things we found we had in common was the Medieval Era.  In my own home, I do not decorate with dragons, but we read fantasy novels, play fantasy video games and computer games, love the Renaissance Festival, and always stop to "gawk" at anything we see on our daily adventures that relates to dragons!
My point in telling you this is to convey just how "TOTALLY COOL!" this lego dragon was to us all when we saw it in the water. :) It's incredible what the Lego folks can do with their little plastic, colorful blocks, but this just blew us away! There is part of this that you can not see - there are four large arches behind this characters head that are his tail - the entire thing spanned over 75 feet of lineal water space. Just awesome!
Material List


Stampin' Up Cardstock - Night of Navy, Real Red, Garden Green, Old Olive, Whisper White
Karen Foster Paper - Dragon Scales
DCWV - All About Boys Paper Stack
Cuttlebug Machine
Cuttlebug "Distressed Stripes" Embossing Folder
Inkjet Printer
Sure Cuts A Lot & Cricut Expression
Glitter Gel Pen
Stampin' Up Circle Punches - 1" & 3/4"
Stampin' Up Corner Punch


The fantastic dragon silhouette was cut from a clip art in SCAL using the Trace Image option. (This piece of artwork was drawn by Becky. You can visit her incredible artwork site here. )
Thanks for looking at my page!

January 24, 2010

The second page of the Iron Guard

Today I wrapped up the second page of my sons Iron Guard Layout for his book. I used most of the same papers as on the first page, with the exception of the papers for banner layers that are checked and the diamond paper on the large banner. (I had to sand this one down to make it distressed to match it closer to the shields paper).

Again, in PSE, I used a gradient map layer on my photo.  The banners on this page were all made on my SCAL program, using basic shapes and banners a lot of welding.

The ribbons on the banners are from JoAnn - it's actually a Christmas ribbon, but it matched! :) The silver thread is embroidery floss.  The brads on this are from Stampin' Up's retired Vintage Brads.  The Font is called Black Castle, and can be found on many free font websites. The Cricut cut this one nicely, I think!


Thanks for checking out my page!

January 23, 2010

Iron Guard Layout

Now that he is a junior, my son is on the Iron Guard at school. This is typically comprised of the junior cadets that hold positions within the corps. The ceremony they perform is a traditional ceremony on Founders Day Weekend, and again on Mothers Day Weekend.
During one of the practices this past fall, the school Commandant approached Kyle and appointed him as the Iron Guard Commander. He was the cadet calling the commands during each ceremony, and he did a fantastic job! This was the first year, since we've been present anyhow, that the commander could be heard clearly across the hall. :) Way to go, Kyle! Your parents are very proud of you. :)
For this layout, I did some more work on my PSE program: I created a gradient map layer to remove the busy background color to focus on Kyle in the photo. In addition to this, I worked in my SCAL program to create the shield photo frame by using the Trace Image option and a jpg of a shield and some leafy decoration clipart that I found for free on the web. I also created the swords on this page by using the shapes file in the SCAL program. Basically, I used an oval and stretched it out to create the blades. I layered a brushed silver cardstock and a shiny mirror cardstock to make the blade look like it has a sharp edge.  The grips are wrapped with embroidery floss.  The paper I used here is by Karen Foster. On the creamy paper, I added some paper glaze over the little dots to give it some dimension.
I'm not good at using any of the file sharing sites, yet, so my SCUT2 files for htis are on the repository at www.svgcuts.com if you're interested in using them. I ask that you please make note of origin on anything you publish using my files, please. :)

Material List

SCAL
Embroidery Floss
Paper Glaze
Stampin' Up Not quite Navy Cardstock
Karen Foster Designer Paper

January 16, 2010

A Jump On Valentine's Day

Isn't this little frog just the CUTEST?! :)
I found him on SVGCuts.com as a freebie, and knew exactly what I wanted to do with him.

Materials
Card Base                       Stampin' Up Real Red CS                        
Heart Layers                   Stampin' Up Whisper White CS
                                       Stampin' Up Close to Cocoa CS
                                       Basic Grey Indian Summer DP
Adhesives                       Stampin' Up Dbl Sided Sticky Tape
                                       Tombow Mono Glue
Frog Cuts                       CTMH Textured Olive
                                       Stampin' Up Retired Wild Wasabi

The scalloped hearts come from the SVGCuts Collection called Scalloped Shapes.
The crown is made from a scrap of yellow and a scrap of red that I had handy.
I made the svg cut for the crown by tracing a free clipart image and playing around in SCAL with the sizing.
I added some Stickles and black brads after inking the edges of the frog with Stampn' Up Old Olive Ink and my sponge daubers. The ribbon on the bottom is from Michaels.
I ran the Close to Cocoa heart through my Cuttlebug using the polka dot embossing folder, and applied it to the card as a debossed layer.
Thanks for checking it out!

October 31, 2009

Autumn Scrapbook Layout

This is a layout I put together between last night and this morning. This picture was taken at my son's school after he bought his new hat. I felt it deserved a nice fall layout because of the beautiful burning bush colors.
For this I used SU cardstock for the base, and for all of the cuts made. I used svgcuts.com September Afternoons collection for the tree, wagon wheel and blocks border. You can purchase this collection of SVG Cuts for SCAL here. I welded the blocks together to create a long enough border for the entire page.
I used burgundy, gold and copper stickles for all of the glittered leaves, and the burgundy was also used on the title, which I cut on SCAL with the Script MT Bold Font.

The wheat was cut from a freebie file (and I'm so sorry for not writing down where I found this - but to whomever it was - thank you!!). It only cut the wheat out of the paper, and I had to cut around the cuts in order to not make it out of a big square of paper. It is filled with gold Stickles.

Thanks for checking it out! Hope you enjoy!

October 22, 2009

SVG Cuts October Challenge Entry

This is my challenge entry for the SVGCuts.com October Challenge (their link is in my sidebar, so check them out!)

I originally planned on a wreath, but someone else beat me to posting it, so I changed plans to this popcorn card crypt! I used Mary's incredible 3D Flowers svg cuts to make all the flowers out of SU Bride and Groom foiled specialty papers. I used Stickles on some, traced the pattern with gel pen on others, and sponged the edges of some of the others! I also cut the leaves from a freebie Maple leaf file that Mary offered up on her blog (again, check out my sidebar and go to their link!). I used more gel pens and Stickles on the leaves. All of these are attached with glue or pop dots to a card stock covered shoe box.


The grim reaper on the front is from the Monster Mash Halloween Collection, as are the black strips on the bottom of each side of the crypt. The orange paper along the top is made using Martha Stewarts Drippy Goo Border punch that I really love!


I hand-cut the shape of the tombstone, and sponged it to make it look grungey before glueing the letters on. These were cut using my Sure Cuts A Lot and Cricut (you can purchase this awesome software by clicking the link at the top right of my blog! Super deal!!). I used Stickles on the letters to stand them out.
The fantastic skeleton is a file I found at Denise's Scrapbooking Room . She did a great job, and this is really easier to assemble than it looks like it would be!


My popcorn cards are made with SU cardstock and some papers from Debbie Mum's Harvest and Holiday paper stack. I used a retired SU stamp set, Booglie Eyes, and my colored pencils, some ribbon, charms, and dbl side sticky tape to put this all together. When you pull the ribbon, a popcorn mini bag comes out! :) Cool, huh??

Thanks for checking out my project! Hope you like (and hope I win the contest!).

September 27, 2009

SVGCuts September Contest Entries

What a great weekend for crafting! Gloomy, crisp fall weather kept me home all weekend, and with Chris out of town, I was left to my own thoughts (and, yep...I actually had some! lol!).


These pics are of some cards and a home decor project that I put together for http://www.svgcuts.com/ September contest. The first prize is a $20 gift certificate for some svg collections, with the second and third prize being one file of choice - I could certainly use any of those! :)


Blessings Card


This first pic shows the Blessings card I made using a stamped image someone had sent to me in a trade. The contest rules state to use fall colors: I was extremely pleased with her! I also had to use an svgcuts image, and on this one, I used Linus;s 3D Fall Cards, the sunflower card. I colored the image in with my Prismacolor pencils, and there is much sponging and distressing on this card. The "blessings" stamp is from the Verve Stamp Set, "Little Punkin". As typical, the pattern paper was out of my stash. The paper in the middle of the sunflower is really cool, I think! This I had purchased on Friday at a local scrapbook store. I bought it to use in my husbands rock n roll album, but snuck a circle piece for this card because it was perfect! Her flowers are all glittered in a beautiful turquoise blue, using Stickles.


Happy Harvest Scarecrow Card

This second picture is of my Happy Harvest Card. I used the same collection for the card, but used the cornstalk instead of the sunflower this time. The scarecrow is from an old Stampin' Up set, Happy Harvest (from 1999). The scarecrow is also colored with Prismacolor pencils, and the cornstalk is lined with a copper-glitter gel pen. I think my favorite part of this is the ribbon. :) It's gorgeous fall colors really set nicely on the marigold colored paper.


Home Decor Project


This next set of photos is from the home decor project I tackled. I used chipboard for the letters on the frame, some glassy glaze, sponging, bleaching (on the leaves), scoring......just about every technique there is! The flowers are from Mary's 3D Flowers, and the bare trees were one of her freebie files. (As of this posting, the svgcuts site is down right now, but I will try to remember to post links later). The branch cut-outs were from Harvest Hill, and the maple leafs were another of the freebie files on her blog. (She's the best! So generous with her freebies!).

The sunset background in the frame was done using baby wipes and re-inkers. To achieve this look, fold a baby wipe in half, place a thin line of the ink color of choice (or you can do multiple colors at a time, placing each color next to the other on the line side-by-side, not top to bottom). Swipe lightly across your paper until you have the color depth you desire. Simple as that!
Thanks for checking it all out! TTFN!